In my system I store backups and archived data to the external drive, mostly items that I don’t plan to access frequently. That being said, there is no reason why it couldn’t be a little quicker when I am using it. Windows Vista has a little known tweak that will speed up your external USB hard drives and I’m going to show you how to do it.
The trick to improving the external drive’s performance is in something called Write Caching. The PC Guide defines write caching as:
Caching reads from the hard disk and caching writes to the hard disk are similar in some ways, but very different in others. They are the same in their overall objective: to decouple the fast PC from the slow mechanics of the hard disk. The key difference is that a write involves a change to the hard disk, while a read does not.
When write caching is enabled, when the system sends a write to the hard disk, the logic circuit records the write in its much faster cache, and then immediately sends back an acknowledgement to the operating system saying, in essence, “all done!” The rest of the system can then proceed on its merry way without having to sit around waiting for the actuator to position and the disk to spin, and so on. This is called write-back caching, because the data is stored in the cache and only “written back” to the platters later on.
Due to the fact that caching tells the operating system that it is done even though it isn’t, there is always the potential for data loss if power is cut. The screenshots below show the warning that explains the you must use the Safely Remove Hardware feature to disconnect the drive. Failing to do so could cause data loss. It is also recommended to have your computer connected to an uninterruptible power supply (UPS) to assist with unexpected power outages.
Now that the education piece is out of the way, here is how to speed up your external USB drives in Windows Vista.
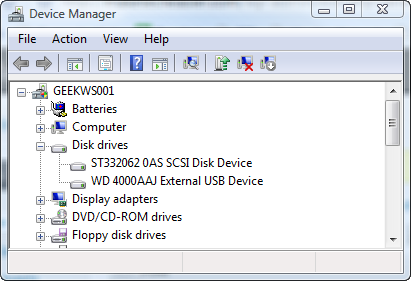
Start by opening the Control Panel, then open Device Manager. Expand Disk Drives and locate your portable drive.

In my example, I’m using a Western Digital 300 GB external drive. Double-click the external drive that you want to adjust to access the properties window.

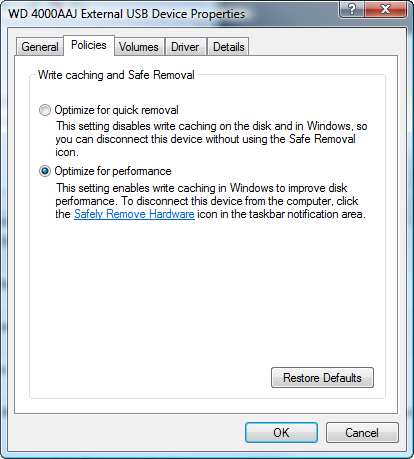
Once open, click on the Policies tab and select the Optimize for performance radio button. Click Ok to save your changes. You should see a prompt like the one below advising you to reboot.

The settings won’t actually take effect until you reboot your computer. Once the reboot is complete you’re done! Wasn’t that easy?


0 nhận xét:
Post a Comment